DIY Photostrip Magnet Save the Dates + Free Templates

A Bit about Us
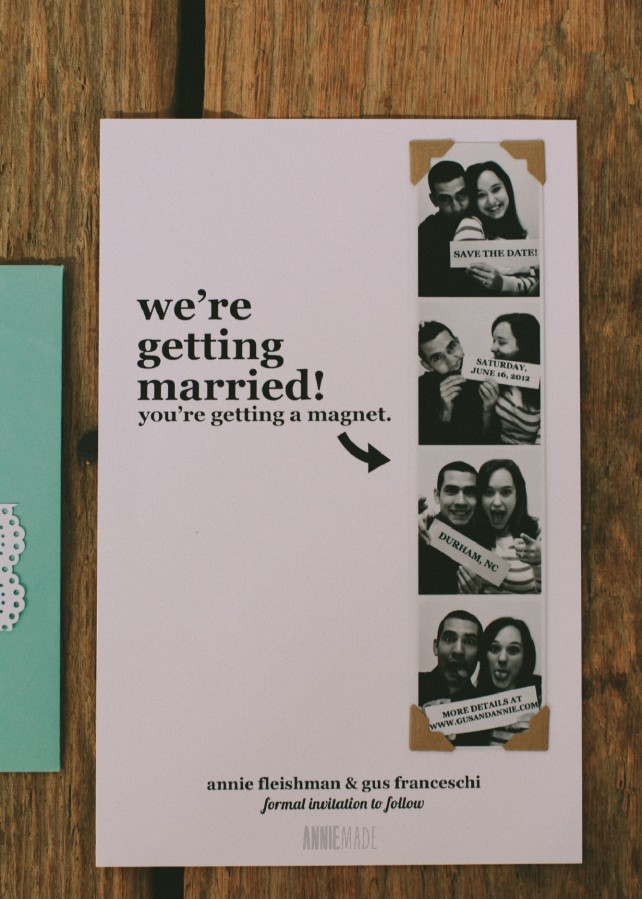
As you may be able to tell from our Save the Date's, my husband Gus and I enjoyed crafting our wedding with a bit of an irreverent, fun, and creative tone. When it came to our DIY Photostrip Magnet Save the Date's, we wanted to send something that 1) communicated our personality, and 2) communicated information, and 3) had a fun and practical component.
Hence, after much monkey-ing with tutorials, gathering inspiration from here, here, and here- we set off and crafted our own magnetic photostrip complete with quirky paper holder. In case you'd like to create these as well, here's my tutorial including templates for the strip and the card. We sent these over a year ago now, and I'll tell you it's still a thrill to see our friends and family keeping our silly faces on their fridge. I hope you create your own spin and enjoy them too!
The Key Components
Gather ye tools and supplies before setting off.
For the Photostrip
- Photostrip Template via Stacey Bishop Photography (PSD File/Awesome PSD tutorial and template here) or Create your Own (Each Strip measures 1.5x7" and 3 can fit on a 5x7")
- Camera with a timer (We used a Nikon D3100)
- Tripod (optional but recommended)
- Staples Magnet Paper (found here - 1 sheet = 7 magnets)
- 3M Spray Adhesive
- Paper trimmer
- Photo Paper or ability to have 5x7 photos printed (We used Target)
- A piece of white cardstock cut to approximately 3"x11"
For the Card
- ANNIEMADE Save the Date Card Templates (PDF) or (PSD) - Right click to select option to open file in a New Tab or Window
- A9 (5.5"x8.5") Flat Paper Cards in the amount desired (We used Paper Source, Pure White found here)
- B&W Inkjet or Laser Printer
- Kraft Self-Adhesive Photo Corners (ours are from Michael's like these, you'll need 4 photo corners x the number of Save the Date's you are creating)
For the Finishing Touch
- Martha StewartWrap-Around Address Label Template
- A9 (5.5"x8.5") Envelopes in the amount desired (We used various colors from Paper Source)
- Staples Sticker Paper (found here)
- Paper Trimmer
- B&W Inkjet or Laser Printer
- Decorative Craft Punch (ours is Martha Stewart via Michael's)
Creating the Cards
Step One: Taking the Photos for your Photostrip

This process goes a lot easier if you have a tripod and a camera with a timer button. We had only the later so we improvised by stacking a few books on our dining table and doing a lot of trial and error. You'll want to make sure that you are both sitting in the same plane so both of you are photographed in focus.
You'll notice that I'm holding that 3"x11" piece of white cardstock. This is key - you'll want to pose holding it as flat towards the camera as possible because this is your base for your text later in the Photoshop template (or wherever you may choose to edit).
When you're ready (and together), start your shooting. We took about 20 different pictures- trying to do a new pose for each. Try some silly, some sweet, maybe even some scary. We had some good outtakes but ended up with four great ones.
Step Two: Dealing with the Photos
Import your photo to your editor of choice and make your selects. Use your editor to convert the photos to black & white. Adjust your brightness as necessary so the photos feel even in tone.
Once ready, I dropped our four photos into the Template using Adobe Photoshop. I encourage you to work from Stacey's great tutorial found here, it was great as I was just learning Photoshop to do this project. Once you've placed your photos, use the Text tool to add text boxes onto the white piece of cardstock in each photo. To make them feel part of the image, rotate your text box until it appears at the same angle as the cardstock. The font I've used is Georgia.
Once I had one of the photostrips done, I copied twice and had a file ready for printing.
Send your file to for printing as a 5x7. One 5x7 yields you photos for 3 magnets, huzzah. Use your paper trimmer to slice your 5x7 photos into three individual strips.
Step Three: Getting Magnetic

Here's the fun part that will ultimately involve many fridges. Break out your Staples Magnet Paper sheets. Using the paper trimmer, slice up enough 1.5x7" strips that you need. You will find that you can get about 7 strips from one sheet.
Using the awesomeness that is 3M Spray adhesive, station yourself outside or near a well-veniliated area. Spray the back of the photo and attach to the magnet strip (white side to photo, obviously).
Let dry. Shortly thereafter, your faces are fridge-worthy.

Creating Your Cards
It's all pretty downhill once you've mastered the photo taking, creation, and magnet adhesion. Whew.
For the cards, use the ANNIEMADE Template (PDF) or (PSD) to print as many A9 cards as needed. Use the PDF if you don't have Adobe Illustrator or Photoshop or aren't familiar with those programs. To change the PDF, all you need to do is use the Georgia font (standard Microsoft font) to your computer and type your bride's and groom's names above "formal invitation to follow." If you want to play with layers and further customize, I invite you to play with the PSD template instead. If you find that you are missing a font, the plain type is Georgia and the fun, handwriting one is Lobster (free to download).
You'll find in the template that there is a faint rectangle that prints on each card. This is your cheat sheet of where to place your finished magnet.
Grab your kraft photo corners and slide four onto one of your magnets- one at each end, with the adhesive side on the same side as the magnet itself. Once you have all of them positioned and snug on each corner, carefully press your photostrip down onto the faint rectangle on your card. Be sure to run your hands across every edge so the adhesive sticky on the photo corner meets the card on all four angles.
With that, your card is complete, and your photostrip magnet is snug and ready to be mailed.
The Finishing Touch: Envelopes & Wrap-Around Labels

Another piece of wedding inspiration I picked up online was the use of Wrap-Around labels. I'd seen many brides use a decorative punch to create their own, and I liked that but I didn't like paying for label paper.
Instead, I picked up some trusty Staples Sticker Paper (Staples has some amazing wedding supplies, more to come on that in the blog in the coming months).
I used a Martha Stewart Template (here) that we printed with sticker paper and a Martha decorative punch found at Michael's.
Once you've printed your labels, use your key paper trimmer (a critical tool for any DIY Bride) and slice each label. Use the decorative punch to punch both ends of the label. When ready, remove the sticker backing and place on envelope, keeping your (return) address on the back and the (to) address on the front.
Note: I was at first concerned about mailing envelopes with wrap-around labels after reading online that the post office machines can read them backwards and mail them all to you (return address) instead of your recipient. Happy to say none of our 80+ bounced back.